Categories
Technology

Die besten 3D-Drucker für 2020

Im Laufe der Jahre haben wir Dutzende von 3D-Druckern getestet, sodass wir eine gute Vorstellung davon haben, was gut ist und was nicht. Aber trotz jahrelanger Behauptungen über großartige billige 3D-Drucker gibt es nicht allzu viele, die unseren hohen Standards für Qualitätsdrucke entsprechen.

Der beste da draußen ist immer noch ein Formlabs-Drucker. Das Form 2 war ein hervorragender Drucker, aber das neu veröffentlichte Form 3 ist noch besser. Es hat eine etwas größere Baufläche und die Drucke, die aus dieser Maschine kommen, sind noch glatter und präziser als die des Vorgängers, was an und für sich beeindruckend ist. Aber es sind immer noch 3.500 US-Dollar, außerhalb der Reichweite der meisten von uns. Es gibt jedoch eine Menge günstigerer Optionen. Wenn Sie also auf dem Markt nach etwas Budgetfreundlicherem suchen, lesen Sie weiter.

Lesen Sie weiter unten in diesem Beitrag einige großartige Angebote für 3D-Drucker, die wir kontinuierlich mit den besten aktuellen Angeboten aktualisieren.

Formlabs Form 3

Bill Roberson / Digitale Trends

Das Form 3 von Formlabs ist keineswegs billig; Weder war sein Vorgänger, das Formular 2. Aber Sie bekommen, wofür Sie bezahlen, oder? Keiner der übrigen Drucker auf dieser Liste hat eine annähernd qualitativ hochwertige Qualität. Und überraschenderweise ist es super einfach zu bedienen.

Es ist erwähnenswert, dass das Formular 3 kein durchschnittlicher FDM-Drucker ist. Es ist eine ganz andere Rasse. Anstatt Plastikfilamente zu erhitzen und durch eine Düse zu spritzen, um Objekte Schicht für Schicht aufzubauen, verwendet das Form 3 ein Laserprojektionssystem, um Objekte aus einem Pool aus UV-härtbarem Harz zu „wachsen“. Wenn der Laser über die Harzschale blitzt, verfestigt sich eine dünne Schicht auf der Bauplatte, die für jede neue Schicht langsam nach oben gezogen wird.

Nun ist klar, dass Form 3 nicht der einzige 3D-Drucker ist, der diese Methode verwendet – aber es ist die einfachste Verwendung des Bündels. Formlabs füllte es mit einer Schiffsladung großartiger Funktionen, die das Drucken auf Harzbasis weniger problematisch machen, wie z. B. eine automatisch füllende Harzschale, und einer ausgeklügelten Druckfunktion, mit der Objekte leichter von der Bauplatte entfernt werden können. Es gibt sogar eine Web-App, mit der Sie den Status Ihres Ausdrucks überprüfen können, wenn Sie sich nicht in der Nähe des Geräts befinden.

Lulzbot Mini 2

lulzbot-mini_1

Es gibt viele Drucker auf dem Markt, die sich an Anfänger richten, aber nur sehr wenige machen das richtig. Eine Sache, die bei „anfängerfreundlichen“ Druckern immer häufiger vorkommt, ist, die verfügbaren Optionen zugunsten einer verwässerten, stark vereinfachten Benutzeroberfläche zu entfernen. Oft haben Sie nur drei verschiedene Auflösungsoptionen (hoch, mittel oder niedrig) und keinen Zugriff oder keine Kontrolle über „verwirrende“ Einstellungen wie Extrusionsgeschwindigkeit, Fülldichte oder Hot-End-Temperatur. Dieser fehlende Zugriff erleichtert die Bedienung des Geräts, schränkt jedoch auch die Möglichkeiten Ihres 3D-Druckers erheblich ein. Dies ist der träge Weg, einen Drucker „benutzerfreundlich“ zu machen.

Lulzbot geht diesen faulen Ansatz nicht an. Anstatt erweiterte Optionen zu entfernen, können Sie mit der Software von Lulzbot Ihre Komplexität und Kontrolle auswählen. Es gibt eine Basisoberfläche, in der Sie nur einfache Einstellungen (Temperatur, Geschwindigkeit, Ebenenhöhe usw.) vornehmen müssen, aber auch eine Registerkarte “Erweitert”, mit der Sie die Druckparameter genauer steuern können. Diese Funktionen eignen sich hervorragend für Anfänger, da sie einfach und unkompliziert sind, wenn Sie noch etwas lernen, aber Sie nicht daran hindern, tiefer zu gehen, Ihr Wissen zu erweitern und mehr aus Ihrem 3D-Drucker herauszuholen.

Der Lulzbot Mini 2 bietet gegenüber seinem Nachfolger einige neue Hauptfunktionen. Äußerlich sieht es genauso aus, aber innen liegen große Veränderungen. Die Druckgeschwindigkeit ist viel schneller und dieser Drucker unterstützt jetzt dank eines brandneuen Druckkopfs eine Vielzahl von Materialien. Mit dem Original haben wir bereits einige Drucke von ziemlich guter Qualität erhalten, daher sollte der neue Drucker theoretisch noch besser sein. Und Sie können diesen Drucker aufrüsten, anstatt daraus zu wachsen, was Sie bei vielen günstigeren Wettbewerbern tun werden.

Monoprice Mini Delta

Monoprice Mini Delta BewertungBill Roberson / Digitale Trends

Bill Roberson / Digitale Trends

Soweit wir das beurteilen können, Monoprice Mini Delta ist einer der billigsten 3D-Drucker, die Sie kaufen können. Das ist kein Kit – aber das ist nicht der einzige Grund, warum wir ihn ausgewählt haben. Dieses Gerät ist nicht nur fertig montiert und sofort einsatzbereit, sondern verfügt auch über ein beheiztes Bett. Wir glauben, dass dies ein entscheidendes Merkmal für FDM-Drucker ist. Dies verhindert Verwerfungen und reduziert das Risiko von Druckfehlern drastisch – und ist normalerweise nur bei Druckern zu finden, die mehr als 1.000 US-Dollar kosten. Dieser kostet 180 Dollar, was umwerfend ist.

Der Mini Delta verfügt außerdem über ein Hot End mit variabler Temperatur, mit dem Sie Einstellungen anpassen und mit einer Vielzahl von Materialien drucken können. Dies umfasst Grundfilamente wie ABS und PLA sowie fortschrittlichere Materialien wie leitfähiges PLA, Holz- und Metallverbundwerkstoffe oder lösliches PVA. Darüber hinaus ist das beheizte Bett selbstnivellierend, sodass Sie das Gerät niemals manuell kalibrieren müssen, bevor Sie einen Druckvorgang starten.

Monoprice gibt Ihnen hier sicherlich viel Geld, aber das Mini Delta ist nicht perfekt. Anfänger sollten mit einer steilen Lernkurve rechnen und bereit sein, ab und zu Fehler zu beheben. Nur weil es billig ist, heißt das nicht, dass es gut für Anfänger ist.

Lesen Sie unseren vollständigen Monoprice Mini Delta Test

Anycubic Photon

Dan Baker / Digitale Trends

Bis vor kurzem waren Stereolithographiedrucker auf Verbraucherebene im Wesentlichen die Einhörner der 3D-Druckwelt. Jahrelang gab es nur wenige davon, die an Verbraucher verkauft wurden, und sie waren für die meisten 3D-Druck-Enthusiasten in der Regel viel zu teuer, um sie sich leisten zu können. Das Anycubic Photon ändert das und ist jetzt fast so billig wie einige Low-End-Drucker.

Dieser Drucker, der bei den meisten Einzelhändlern weniger als 250 US-Dollar kostet, ist in der Lage, wahnsinnig detailreiche Objekte herzustellen. Dies ist vor allem dem SLA / DLP-Druckverfahren zu verdanken, mit dem das Gerät mit extrem dünnen Schichten drucken kann. Wir sprechen von weniger als einem Zehntel der Breite eines menschlichen Haares. Machen Sie keinen Fehler – die Drucke des Photon sind noch detaillierter als die des hochwertigsten FDM-Druckers, den wir je getestet haben.

Seien Sie jedoch gewarnt. Dieses Detail hat seinen Preis. Leider hat das Photon auch einen unglaublich kleinen Umschlag, so dass Sie nichts überdrucken können 115 × 65 × 155 Millimeter (4,5 × 2,5 × 6,1 Zoll). Es ist auch eine Qual, mit dem klebrigen, stinkenden und leicht giftigen Harz des Druckers zu arbeiten. Sie müssen Handschuhe tragen, um ein Berühren zu vermeiden, und die fertigen Teile in Isopropylalkohol einweichen, um ungehärtete Gänsehaut zu entfernen. Es ist bei weitem nicht so bequem oder wartungsarm wie ein durchschnittlicher FDM-Drucker.

Das Photon ist zwar ein preisgünstiges Tier in Bezug auf die Druckleistung, aber nicht jedermanns Sache.

Lesen Sie unseren vollständigen Anycubic Photon-Test

Monoprice Maker Select Plus

Monoprice Maker Select Plus

Bis Monoprice in die 3D-Druck-Arena vordrang, war es schwierig, einen Drucker unter 1.000 US-Dollar zu finden, der eine große Baufläche, ein beheiztes Bett, einen stabilen Rahmen und einen Extruder mit vielen verschiedenen Materialien hatte. Ehrlich gesagt fast unmöglich. Jetzt gibt es viele Optionen in dieser Preisklasse, und die MP Maker Select Plus ist wohl das Beste vom ganzen Haufen – es sei denn, Sie sind bereit, ein Kit zu kaufen und den Drucker selbst zu bauen.

Die meisten Drucker in der Preisklasse unter 500 US-Dollar haben Bauflächen, die in Länge / Breite / Höhe nicht größer als 6 Zoll sind. Der MSP verfügt jedoch über eine große Bauform von 7,9 × 7.9 × 7,1 Zoll, was nichts zu verspotten ist. Dies bedeutet nicht nur, dass Sie größere Teile drucken können, sondern Sie können auch mehr kleine Teile auf die Bauplatte montieren, was die Produktionszeiten verkürzt.

Diese Bauplatte wird ebenfalls erwärmt, wodurch verhindert wird, dass das extrudierte Filament abkühlt, sich zusammenzieht und die Form Ihres Druckobjekts verzieht. Diese Funktion ist von entscheidender Bedeutung (insbesondere, wenn Sie mit ABS drucken), verringert die Wahrscheinlichkeit eines Druckfehlers drastisch und macht das Drucken mit einem Floß überflüssig, das zusätzliche Filamente verbraucht.

Lesen Sie unseren vollständigen Monoprice Maker Select Plus-Test

Heutige Angebote für 3D-Drucker

Während einige dieser Drucker möglicherweise nicht in unsere Liste aufgenommen wurden, haben wir nachfolgend eine Liste der guten Angebote für 3D-Drucker zusammengestellt, die derzeit laufen.

Wie wir testen

Um die verschiedenen 3D-Drucker zu testen, die wir zur Überprüfung erhalten, drucken wir einen sorgfältig ausgewählten Satz von Objekten. Diese Suite enthält 3DBenchy, ctrlV v3, einen Warp-Test und einige andere. Zusammen haben diese Objekte fast alles, mit dem Drucker im Allgemeinen zu kämpfen haben: Oberflächen mit geringer Neigung, Überhänge, nicht unterstützte Bereiche, feine Details und vieles mehr. Wenn ein Drucker in etwas nicht gut ist, werden diese Formen es hervorheben.

Sie können sich nie sicher sein, deshalb testen wir den Drucker noch mindestens ein halbes Dutzend Mal. Wir drucken zufällige Dokumente und Bilder, die verschiedene Mitarbeiter zu diesem Zeitpunkt benötigen, was den betreffenden Druckern einen gründlicheren Test bietet. Wenn wir dieselbe Aufgabe wiederholt zum Testen des Druckers verwendet haben, könnten Probleme mit anderen Aufgaben übersehen werden.

Wenn alles gesagt und getan ist, nehmen wir eine Handvoll unserer Testdrucke und machen ein paar hochauflösende Bilder, damit Sie selbst sehen können, wie sie sich herausstellten. Wir messen auch bestimmte Teile des Drucks mit einem Mikrometer, um festzustellen, wie genau das physikalische Modell im Vergleich zum digitalen Modell ist.

Aber natürlich sind Auflösung und Genauigkeit nicht alles. Nachdem wir mit dem Drucken fertig sind, bewerten wir auch den relativen Reparatur- und Aufrüstbarkeitsgrad der Maschine. Wir prüfen, ob Sie es leicht zerlegen und daran basteln können, wenn etwas schief geht. Wir fragen auch, ob Sie die Komponenten des Druckers aktualisieren können, wenn neuere, bessere verfügbar werden. Zuletzt stellen wir fest, ob es in einigen Jahren veraltet sein wird. Wir gehen unter die Haube und finden alles für Sie heraus.

Hilfreiche Begriffe zu wissen

  • FDM: Modellierung der Filamentabscheidung. Auch als FFF- oder Fused Filament-Herstellung bekannt. Dies ist die gebräuchlichste Art des 3D-Drucks. Sie schmilzt ein thermoplastisches Filament, spritzt es durch eine Düse und legt es dann Schicht für Schicht ab, um ein Objekt zu bilden.
  • SALAT: Abkürzung für Stereolithographie. Es handelt sich um einen 3D-Druckstil, bei dem mithilfe eines Laserprojektionssystems Objekte aus einem Pool aus UV-härtbarem Harz „gezüchtet“ werden.
  • Heißes Ende: Die beheizte Düse, durch die Kunststofffilamente in einem FDM-Drucker extrudiert werden.
  • Beheiztes Bett: Dies bezieht sich auf eine beheizte Bauplatte, die verhindert, dass die ersten Schichten aus extrudiertem Kunststoff abkühlen und sich verziehen. Wenn sich Ihr Projekt verzieht, führt dies häufig zu Druckfehlern.
  • ABS: Es steht für Acylonitril-Butadien-Styrol. Ein Kunststoff auf Ölbasis, der üblicherweise als 3D-Druckfilament verwendet wird. Es ist ein starkes, robustes Material, das üblicherweise für die Konstruktion von Autoteilen aus Kunststoff, Musikinstrumenten und den beliebten Lego-Bausteinen verwendet wird. ABS hat einen hohen Schmelzpunkt und kann sich beim Abkühlen während des Druckens verziehen. Aus diesem Grund müssen ABS-Objekte auf eine beheizte Oberfläche gedruckt werden, was viele Drucker zu Hause nicht haben.
  • PLA: Polymilchsäure wird aus organischem Material hergestellt – speziell Maisstärke und Zuckerrohr. Dies macht das Material einfacher und sicherer zu verwenden und verleiht ihm ein glatteres und glänzenderes Aussehen, das ästhetischer ist. Während PLA auf den ersten Blick als bessere Wahl erscheint, weist es einen weitaus niedrigeren Schmelzpunkt als ABS auf. Dies bedeutet, dass die Verwendung von PLA-gedruckten Teilen für mechanische Vorgänge oder sogar die Lagerung an Hochtemperaturorten dazu führen kann, dass sich das Teil verzieht, reißt oder schmilzt.

Empfehlungen der Redaktion


Categories
Technology

The Greatest Drones Beneath $500

When drones first became popular, there were essentially two kinds you could buy. The first was the super-cheap — and flimsy — drone that would fly for about five minutes on a full charge. The second was the more hardcore drone costing $1,000 or more, fully stocked with all the features you could ever want, including an HD camera, GPS, and long-range radio controllers.

These days, however, there are more options on the market, and even inexpensive drones have lots of cool features. The best drones under $500 now boast 4K cameras, obstacle-avoidance systems, and user-friendly apps. If you’re a novice or if you’re looking to buy for someone who fits that description, chances are you don’t need to drop thousands on a top-shelf model. We’ve found tons of cheaper options that’ll make for perfect introductions to the field (or just fun toys for weekend use). The DJI Mavic Mini is our best pick since its lightweight and has an app with a lot of features.

If you’re looking for the best of the best when it comes to drones, check out our all-time favorite models. If you’re working with a smaller budget, here’s a list of our favorite low-cost drones and best Black Friday drone deals.

At a glance

The best drone under $500: DJI Mavic Mini

Why should you buy this: It’s portable, lightweight, and controlled with an intuitive, feature-rich app.

Who’s it for: First-time drone buyers who want easy controls and reliable performance.

Why we picked the DJI Mavic Mini:

Leading drone brand DJI strikes again with the portable Mavic Mini drone, a compact flyer that is great for beginners and exceptionally compact. The entire drone weighs less than 1 pound, which is about the weight of the average smartphone. That also takes into account the battery pack, propellors, and microSD card. In fact, the Mavic weighs so little that it may not require registration with your local government — although you’ll want to be sure of this before sending yours into the sky.

The DJI Fly app (for iOS and Android) makes launching your Mavic quick and simple. Easy presets and quick-tap commands will have you taking expert photos and videos like a seasoned pro. If it’s your first time controlling a drone, the app also features a Flight Tutorial mode for walking you through the basics of commanding your winged companion. Control range is up to 2.5 miles, and you’ll get about 25 minutes of airtime from the Mini’s battery.

For the money, we do wish the DJI Mavic Mini was capable of 4K. The onboard camera is only capable of 2.7K HD video and 12-megapixel stills. While this may be sufficient for many first-time drone buyers or infrequent hobbyists, those with a penchant for flight photography should set their sights on our next choice.

Read our full DJI Mavic Mini review

The best drone under $500 for beginners: Holy Stone HS120D

Why should you buy this: You want a performance-driven drone that is loaded with easy-to-use features.

Who’s it for: Those looking for a great first drone at a solid price.

Why we picked the Holy Stone HS120D:

What we love most about the Holy Stone HS120D is its dressed-to-impress design. For starters, we love the intuitive Follow Me mode. Once the camera locks onto a designated person, the drone will follow them midair at an ideal height and distance for taking selfies and capturing jaw-dropping video. If you’ve got a scenic route in mind, the Holy Stone app (iOS and Android) will let you map out a custom route with just a few finger traces across your phone screen. The drone also responds to various gestures for real-time photo-taking — just make sure you and your crew of friends are close enough for the camera to pick up your hand signals.

Speaking of the camera, the HS120D doesn’t cut corners. While you won’t be getting 4K video, what you will receive is beautiful 2K capture and live views. Camera controls are simple to adjust, and snapshots and recorded video look pristine, which says a lot for the lower price.

The Holy Stone HS120D boasts single-key takeoff and landing which means you won’t be worrying about how to properly start and end your flight. The twin batteries are rated for up to 36 minutes of airtime, but not to fear if your indicator starts flashing red: The Auto Return function automatically kicks in if the drone loses GPS signal or if your batteries start draining, so you won’t have to worry about crash-landing in an unreachable place.

The best UHD drone under $500: Potensic 4K Dreamer Quadcopter

Product still of the Potensic Dreamer w/ included accessories

Why should you buy this: You’re after a solid 4K drone that doesn’t compromise on other drone fundamentals, like stability and battery.

Who’s it for: Those shopping on a budget who are seeking the higher-quality photo/video capabilities of many flagship drones.

Why we picked the Potensic 4K Dreamer Quadcopter:

4K drones can easily live in the $1,000+ price range, but we’re betting that most photo/video connoisseurs and seasoned flight hobbyists will feel right at home with the almighty Potensic Dreamer drone. At just a fraction of the cost of many big-ticket flying machines, the $300 Dreamer is fully outfitted for lush 4K photos and video. It’s all thanks to Sony’s onboard 4K lens and image processor. At any height or distance, the 90-degree photo-sensitive lens will automatically adjust and balance your image for the best real-time capture. The 5.8G Wi-Fi transmission means your 4K footage gets pinged back to your phone almost instantly — just make sure you’re no more than 1,6oo feet away.

The batteries are rated for up to 31 minutes of flight time on a full charge. Better yet, if the packs are getting weak but you’ve found something you really want to snap a photo of, the Potensic 4K Dreamer Quadcopter‘s PowerAC Dynamic System will kick in, netting you a few seconds of extra power and stability. Several different flight modes are available to experiment with, including Follow Me, circle flight, and waypoint mapping. There’s also an auto-return mode for GPS signal loss and low battery.

The best GoPro-ready drone under $500: Force1 F100GP GoPro-Compatible Drone

Product still of airborne Force1 drone

Why you should buy this: You want a drone that can do a little bit of everything — and for a long time.

Who’s it for: Those who prefer a classic controller over an app on their phone.

Why we picked the Force1 F100:

The Force1 F100 is really the best of two worlds: Impressive photographic features meet endurance and durability. Let’s start with the camera capabilities.

First and foremost, GoPro enthusiasts will love the Hero 3 and 4 universal mount. Your GoPro snaps right into the chassis, and then you’re clear for takeoff. If you’re without a GoPro action cam, the F100’s onboard 1080 HD camera is nothing to shake a stick at. The lens is light-adaptive and well-balanced, making for clear and stable photos and videos. Better yet, there are two LED headlamps for adding illumination to your nighttime shots.

On the endurance end, you’re looking at two batteries for up to 30 minutes of flight time, as well as brushless motors for quiet and long-lasting operation. The drone also operates at either high or low speeds. In our opinion, the Force1 F100GP GoPro-Compatible Drone mimics the performance and features of higher-priced drones, doing so quite convincingly.

The best drone under $500 for kids: Snaptain SP350 Mini Drone

Product still of the Snaptain SP350

Why should you buy this: You’re looking for a fun and reliable junior drone for kids of any age.

Who’s it for: Kids that dig interactive toys and their parents who want said toys to be durable and hazard-free.

Why we picked the Snaptain SP350 Mini Drone:

Letting your son or daughter man an airborne drone is a scary prospect. That’s exactly what the folks at Snaptain had in mind when designing their SP350 Mini Drone. At an otherworldly low cost of $30, the SP350 is built for a long road of bumps and scratches. The body of the drone is rugged and built for action, an armor only enhanced by the durable, plastic guard rings cased around the propellors.

In terms of actual aviation, the Throw’n Go function still blows our minds. In lieu of a launch button on the controller, once the SP350 is lightly tossed into the air, it automatically revs up, stabilizes, and remains airborne. Then, your kid can grab the remote pad and get to work. Tiny pilots will really love the adventurous flight controls, with features like Circle Fly (with multiple speed adjustments), 3D spins and dives, and Headless Mode, which positions the drone in the direction its human pilot is facing. The drone comes with three battery packs that, fully-charged, deliver 7 minutes of flight time. It’s not much, but fewer air minutes means a longer-lasting toy drone.

For the money, you won’t find a camera here. The Snaptain SP350 Mini Drone is more of a dazzling performance toy than a fully comprehensive drone, but considering its attractive price and extremely entertaining features, you really can’t go wrong with Snaptain. The SP350 is just one of several Mini Drones that Snaptain makes, but it’s our personal favorite of the bunch.

The best drone under $500 for battery life: Ruko F11 Pro

Imagined art for the Ruko 4K F11 Pro

Why should you buy this: You want the best battery life you can get, but don’t want to lose out on other great drone features.

Who’s it for: Those who like photographing scenic imagery, leaving their drone airborne for as long as possible.

Why we picked the Ruko F11 Pro:

Many of the drones on our list have batteries that get close to 30 minutes of airtime on a full charge. The Ruko F11 Pro will net you double the airtime. The F11 comes with two 2500mAh rechargeable batteries, which come in handy if you’ve got a ton of scenery you want to photograph, or if you want to do a bit of worry-free exploring.

The F11’s UHD camera takes brilliant 4K stills across a 120-degree field of view. The lens itself is also adjustable up to 90 degrees. On the downside, you won’t get full 4K video, but the camera does manage to pull off 2.9K.

With brushless motors for quieter and better-stabilized images, along with a number of popular flight options like Follow Me, Headless, and custom flight paths, the Ruko F11 Pro combines sharp and responsive camera work, excellent design, and extended battery life, all under one cohesive and user-friendly copter.

How we test drones

Build quality and design

The first thing we do when we get a new drone is beat it up a little bit. We don’t kick it down the stairs or anything, but we’ll give it a few knocks, twists, and shallow drops to assess the build quality and durability. Does it feel flimsy, or does it feel like it could survive a crash landing in the park? We give each review unit a light beating (and usually a couple of unintentional crash landings) before we give you a definitive answer on how durable it is.

Flight performance, range, and autonomy

We don’t want to just take the manufacturer’s word for it, so we will test the drone’s flight performance to see for ourselves. We start by testing the drone’s horizontal speed, using a clearly marked football field for reference. A football field expresses measurement in yards, so our next step would be to convert yards per minute to miles per hour. After that, we do a similar test to assess ascent and descent speeds. All the while, we’re also taking notes on how responsive the controls are, how stable the craft is, how far it can go before it’s out of range, and what the overall piloting experience is like compared to other drones.

Battery life and charge time

After testing the drone and taking a few notes on the battery life, we toss it on the charger, grab a stopwatch, and determine recharge time. Afterward, we bring it back out and perform a hover test. By flying the drone in the least demanding conditions, we get a sense of the maximum flight time. We let the drone take a few more test spins to get a better read on its average battery life under normal conditions.

Camera, accessories, and upgradability

If the drone we test happens to be equipped with a camera capable of recording, we capture as much footage as possible. We’ll shoot in several environments, ranging from light to dark, including lots of color and contrast. Then, the footage is compared to the highlight reels we filmed with other drones, helping us to get a feel for where the camera performs best and where it struggles. We also test any accessories that accompany the camera, like lenses, filters, gimbals, or FPV goggles. Finally, we’ll also let you know if the camera setup is upgradable, so you won’t be stuck with an outdated shooter in two years.

We also do our research

In the event that we are unable to test a product for ourselves, we begin with a full-scale assessment of the specifications. Then, we’ll comb through any available reviews and forum posts online to surveil for outstanding problems and attempt to find at least two videos of the product in motion.  Though we cannot physically review every drone yet, we’re ever-committed to helping you find a great quadcopter.

Editors’ Recommendations


Categories
Technology

Die besten elektrischen Skateboards für 2020

Einfach ausgedrückt, die Menschheit lebt im goldenen Zeitalter der fahrbaren Technologie, und wir lieben es. Tatsächlich gibt es fast zu viele Rideables, um den Überblick zu behalten, und die Ausrüstung scheint mit jedem Monat verrückter und fortschrittlicher zu werden. Um Ihnen die Navigation auf dem zunehmend überfüllten Markt zu erleichtern, haben wir diese Liste der besten elektrischen Skateboards zusammengestellt, die Sie derzeit kaufen können.

Wir haben einige der mächtigsten E-Boards der Branche in die Hände bekommen und dabei Kriterien wie Haltbarkeit, Akkulaufzeit, Benutzerfreundlichkeit und Preis untersucht. Das Boosted Stealth ist unsere erste Wahl, weil es Komfort und Kontrolle bietet und verschiedene Modi zur Auswahl hat.

Auf einen Blick

Das beste elektrische Skateboard: Boosted Stealth

Warum sollten Sie dieses elektrische Skateboard kaufen: Der Boosted Stealth kombiniert Komfort, Leistung und Haltbarkeit und sorgt so für das ultimative Fahrgefühl.

Für wen es ist: Begeisterte Skater, die eine willkommene elektrische Unterstützung in ihren Alltag integrieren möchten.

Wie viel wird es kosten? 1.599 US-Dollar

Warum wir uns für Boosted Stealth entschieden haben:

Für das Beste aus vielen Welten gibt es einfach keine bessere Wahl als das Boosted Stealth, ein 17-Pfund-Longboard, das für müheloses Fahren, Komfort und Kontrolle ausgelegt ist. Alles beginnt mit dem Super Flex Composite Deck, einer adaptiven, konkaven Plattform, die für komfortables Langstreckenfahren über mehrere Geländetypen ausgelegt ist. Es fühlt sich robust und natürlich an, von einer steilen Steigung von 25% auf eine flache Stadtstraße mit Passanten zu gelangen. Dies ist zum Teil auch den neuesten Verbesserungen des Antriebsstrangs von Boosted zu verdanken, die über strenge CNC-LKWs verfügen, die bei Bedarf ein größeres Drücken und Ziehen ermöglichen.

Der Stealth bietet fünf verschiedene Modi zur Auswahl, darunter den neuen Hyper-Modus von Boost für diejenigen, die das Board auf maximal 24 km / h bringen möchten. Das Umschalten zwischen den einzelnen Geschwindigkeitsklassen ist mit der Bluetooth-Fernbedienung schnell und einfach, und es gibt nicht viel von einem „Schaltgefühl“, von dem man sprechen kann. Das Gesamtdrehmoment ist eng und konstant, insbesondere in den höheren Drehzahlbereichen, und die Gesamtbeschleunigung / -verzögerung ist erstklassig. Die 85-mm-Stratus-Räder sind extrem griffig, ein guter Sicherheitsaspekt, aber ein kleines Hindernis für Leistungsfahrer, die Bewegungen ausführen und sich durch die Menge schlängeln möchten.

Das Boosted Stealth Vielleicht ist es nicht das beste Board für E-Skater, aber diejenigen, die schon eine Weile dabei sind, werden wissen, dass sie in guten Händen sind, sobald ihre Füße das Deck berühren.

Das beste elektrische Skateboard für Pendler: Boosted Mini X.

Screenshot des Boosted Mini X mit Fahrern

Warum sollten Sie dieses elektrische Skateboard kaufen: Es ist wendig, tragbar und ideal für städtische Umgebungen.

Für wen es ist: Jeder, der sein Board als zuverlässiges und komfortables Transportmittel nutzen möchte.

Wie viel wird es kosten? 999 $

Warum wir uns für den Boosted Mini X entschieden haben:

Boosted macht einige der besten elektrischen Longboards im Geschäft, und der Mini ist keine Ausnahme. Trotz der Tatsache, dass die Akkulaufzeit nicht so hoch ist wie die der größeren Geschwister, gleicht es diesen Mangel mit einer Vielzahl fantastischer Funktionen aus. Unser Lieblings? Das Deck. Es hat diese schöne radiale konkave Form, die eine komfortable und dennoch reaktionsschnelle Plattform bietet, auf der Sie stehen können, und diesmal hat Boosted ihr sogar einen Kicktail gegeben. Dies macht es viel einfacher, das Board herumzuschlagen und bei Bedarf enge Kurven zu fahren. Das Deck des Mini ist außerdem erheblich kürzer als das der vorherigen Boosted-Boards, sodass Sie es ganz einfach mit einem Bus, Zug oder einem anderen Transportmittel aufnehmen können.

Dieses Board ist außerdem mit dem erstklassigen Steuersystem von Boosted ausgestattet und bietet daher eine äußerst gleichmäßige Beschleunigung / Verzögerung während der Fahrt. Bei billigeren Boards sind Beschleunigen und Bremsen entweder zu schnell und zu schnell oder zu weich und träge, aber Boosted-Boards sorgen für eine perfekte Balance. Das Boosted Mini X. fühlt sich kraftvoll und doch kontrolliert unter Ihren Füßen an und ermöglicht es Ihnen, unabhängig von Ihrem Können sicher zu fahren. Dieses Board ist absolut ideal für Pendler.

Das beste elektrische Skateboard für Power: Meepo AWD Pro

Produkt noch vom Meepo AWD Pro

Warum sollten Sie dieses elektrische Skateboard kaufen: Es wird Ihnen schwer fallen, ein leistungsstärkeres elektrisches Skateboard zu finden.

Für wen es ist: Speed-Junkies, Nervenkitzel-Suchende und Menschen, die in hügeligen Gegenden leben.

Wie viel wird es kosten? $ 799

Warum wir uns für den Meepo AWD Pro entschieden haben:

Elektrische Skateboards gibt es mittlerweile in nahezu jeder Form, Größe und Konfiguration. Die Mitarbeiter von Meepo sind jedoch entschlossen, ihre Skateboards dank vier 540-Watt-Nabenmotoren zu einem der stärksten zu machen. Für diejenigen unter Ihnen, die zu Hause punkten, ist das eine für jedes Rad – was absolut verrückt ist. Mit so vielen Motoren bietet dieses Board das höchste Drehmoment, die höchste Leistung und die höchste Geschwindigkeit aller Elektroboards, die wir je gefahren sind. Es erreicht eine Höchstgeschwindigkeit von 34 km / h, kann in 2,5 Sekunden von null auf 30 km / h beschleunigen und Hügel mit einer Steigung von bis zu 35% erklimmen.

Der einzige Nachteil? Das Board ist etwas schwer und wiegt 23 Pfund. Dieses zusätzliche Gewicht bedeutet auch, dass es nicht ganz so verspielt und leicht zu manövrieren ist wie ein kleineres Board, aber das Meepo AWD Pro ist ein Longboard und ein großes (mit einer Flügelspannweite von 40 Zoll). Fahrer, die die kompakte Leichtigkeit von etwas wie dem Boosted Mini X erwarten, werden diese Erfahrung mit Meepos Angebot einfach nicht machen können.

Das am besten gestaltete elektrische Skateboard: Skatebolt Tornado II

Screenshot des Skatepro mit zwei Fahrern

Warum sollten Sie dieses elektrische Skateboard kaufen: Der Tornado II verfügt über einige der besten Sicherheits- und Leistungsmerkmale.

Für wen es ist: Erstmalige E-Boarder und erfahrene Profis, die gerne nach Stunden herumfahren.

Wie viel wird es kosten? $ 519

Warum wir uns für den Skatebolt Tornado II entschieden haben:

Eine unserer Lieblingssachen am Skatebolt Tornado II ist die Vielzahl an Sicherheitsfunktionen, mit denen das Board ausgestattet ist – und das zu relativ geringen Kosten. Für den Anfang besteht das Deck aus acht Schichten Nordostahorn, die Fahrergewichte von bis zu 280 Pfund tragen. Das breitere Deck und die größeren Radachsen verteilen das Gewicht gleichmäßig und gleichmäßig und sorgen so für eine stabile Fahrt bei nahezu jeder Geschwindigkeit.

Die Fernbedienung verfügt über einen hintergrundbeleuchteten LCD-Bildschirm zur Überprüfung von Geschwindigkeit, Batterielebensdauer und Bremsmodus sowie Tasten zum Umschalten der Board-Richtung und zum Aktivieren der Geschwindigkeitsregelung. Wir lieben auch die beiden roten LED-Rücklichter, die ein großartiges Sicherheitsmerkmal für Fahrten in der Nähe der Dunkelheit oder an überfüllten Orten darstellen, an denen Richtungs- und Warnblinklichter für Fahrer und Fußgänger von entscheidender Bedeutung sind.

Das Skatebolt Tornado II spart auch nicht an Leistung. Das Board kann Höchstgeschwindigkeiten von 26 Meilen pro Stunde erreichen und eine Steigung von 25% erreichen. Der einzige Nachteil, den wir uns vorstellen können, ist die Akkulaufzeit. Während das Board mit einer einzigen Ladung etwa 24 km weit herauskurbeln kann, haben sich eine Handvoll Tornado II-Besitzer darüber beschwert, dass es eine Weile dauert, bis der Akku vollständig aufgeladen ist.

Das beste Budget-Elektro-Skateboard: Acton Blink SR

Screenshot des Blink SR mit Fahrer bei Nacht

Warum sollten Sie dieses elektrische Skateboard kaufen: Das Blink SR ist das beste preisgünstige elektrische Skateboard auf dem Markt.

Für wen es ist: Diejenigen, die das elektrische Skateboardwasser testen möchten, ohne auf ein High-End-Modell all-in zu gehen.

Wie viel wird es kosten? 399 $

Warum wir uns für den Blink SR entschieden haben:

Während häufige Skater es vorziehen, in ein Premium-Elektro-Skateboard zu investieren, möchten Leute, die ihr Board seltener oder hauptsächlich am Wochenende benutzen, möglicherweise mit einer Budgetoption beginnen. Der Blink SR ist viel günstiger als viele der anderen Modelle auf unserer Liste. Er ist perfekt für jemanden, der eine lockere Art sucht, sich in der Stadt fortzubewegen. Mit einem Gewicht von nur 11 Pfund fühlt sich dieses Board auch leichter an als viele andere Einträge auf unserer Liste. Der SR kann Höchstgeschwindigkeiten von 24 km / h erreichen und Hügel mit 15% Steigung bewältigen, was sich hervorragend zum Peitschen auf den meisten herkömmlichen Wanderwegen und Straßen eignet. Erwarten Sie nur nicht, diesen kleinen Kerl auf supersteile Hügel zu reißen. Es hat einfach nicht die Kraft, es zu verwirklichen!

Auch hier ist die Akkulaufzeit ziemlich hoch. Das Board kann mit voller Ladung etwa 11 km weit fahren und benötigt nur etwas mehr als eine Stunde, um erneut zu entsaften. Für diejenigen, die sich im E-Boarding versuchen möchten und diejenigen, die den Teig nicht auf eine teurere Option fallen lassen möchten, die Acton Blink SR ist eines der besten Modelle, mit denen man anfangen kann zu fahren. Skating-Tierärzte und Performance-Boarder werden wahrscheinlich mit etwas Stärkerem zufriedener sein.

Das beste geländegängige elektrische Skateboard: Ownboard Carbon AT

Warum sollten Sie dieses elektrische Skateboard kaufen: Ihre Skate-Sessions finden Sie überall, vom unebenen Pflaster bis zum Offroad-Fahren durch Ihren örtlichen Park.

Für wen ist es: Skater, die ihr Risiko mit weniger skaterfreundlichen Oberflächen eingehen.

Wie viel wird es kosten? 1.069 US-Dollar

Warum wir uns für das Ownboard Carbon AT entschieden haben:

Dieses Monster eines E-Boards ist dafür gemacht, durch alles zu skaten, was man darauf werfen kann – also in Bezug auf das Gelände. Nach dem Auspacken sehen Sie 6-Zoll-Wabenreifen aus Gummi, robuste Räder, die durch kurzes Gras, Schmutz oder Kies auf ihrem Weg schieben. Für diejenigen, die eine Vorliebe für das Eintauchen in noch hügeligeres Gelände haben, können Sie das Board mit 7-Zoll-Wolkenrädern für besseren Grip und bessere Leistung bestellen.

Das 40-Zoll-Kohlefaserdeck ist so konstruiert, dass es genauso viel Schlagkraft wie die Reifen aushält und gleichzeitig ein stabiles und komfortables Fahrverdeck bietet. Der Carbon AT kann 220-Pfund-Lasten bewältigen und erreicht Höchstgeschwindigkeiten von 24 Meilen pro Stunde sowie Steigungen von bis zu 30%. Es stehen außerdem drei verschiedene Geschwindigkeitsmodi zur Auswahl, mit einer maximalen Reichweite von ca. 32 km.

Machtmäßig ist die Ownboard Carbon AT Packt einige schwere Ausrüstung, einschließlich eines 1500-Watt-Zweiriemenmotors und eines wiederaufladbaren 14AH Sanyo-Akkus. Die Komponenten belasten das Board nicht wirklich, aber wir wünschen uns, dass der Akku, der in vier bis fünf Stunden aufgeladen wird, etwas schneller aufgeladen wird. Wenn Sie einen Tag im Gelände verbringen möchten, empfehlen wir Ihnen, den Akku über Nacht aufzuladen.

Das beste elektrische Skateboard für Kinder und Jugendliche: Swagtron Swagskate NG3

Screenshot des Swagtron NS3 mit Fahrer

Warum sollten Sie dieses elektrische Skateboard kaufen: Sie möchten ein sicheres und zuverlässiges Board, auf das Ihr aufgeregter Jugendlicher schlagen kann.

Für wen ist es: Kinder, Jugendliche und Internatsschüler lernen immer noch die Seile.

Wie viel wird es kosten? 99 $

Warum wir uns für das Swagtron Swagskate NG3 entschieden haben:

Die Hersteller von Swagtron bauten den Swagskate NG3 im besten Interesse von Eltern und Kindern, um die Sicherheitsstandards zu erfüllen und gleichzeitig maximale Unterhaltung zu gewährleisten. Mit einem Gewicht von 8 Pfund und einer Größe von knapp 20 Zoll ist das Board klein genug, um fast überall hin mitgenommen zu werden. Das 9-Zoll-Deck aus Polypropylen ist langlebig und balanciert gut.

Die Kick-to-Cruise-Funktion ist einer unserer absoluten Favoriten. Sobald das Board die Geschwindigkeit erreicht hat, wird die Geschwindigkeitsregelung aktiviert und hält jede Geschwindigkeit bis zu 9,3 Meilen pro Stunde. Die Sensoren an Bord erfassen Ihr Gewicht und Ihre Gleichgewichtsverlagerung, wenn Sie mit dem Fahren fertig sind, und bringen den NG3 sicher und solide zum Stillstand. Der Akku hält auch eine ganze Weile. Mit einer vollen Ladung erreichen Sie ungefähr 7 Meilen Fahrzeit, und das Pack benötigt nur etwa eine Stunde, um eine volle Ladung zu erreichen.

Was dem Swagtron Swagskate NG3 an ausgefallenen Funktionen oder zusätzlichen Geräten wie Fernbedienungen fehlt, gleicht er an Sicherheit aus. Eltern können sicher sein, dass ihre Kinder einen guten, sauberen Spaß haben können, wenn sie dieses E-Board ausprobieren.

Empfehlungen der Redaktion


Categories
Technology

Former Salesforce science boss founds You.com for Google search

A new challenger enters the arena! Richard Socher, former chief scientist at Salesforce, dropped the figurative bomb today when he announced the launch of You.com, a website he believes will directly compete with Google search.

https://t.co/2tfrBwhwOc

Let’s build a new internet together.

– Richard Socher (@RichardSocher), December 8, 2020

Heads up: It looks like TechCrunch’s Ron Miller got the bullet. Socher wants to “differentiate himself from Google by not relying on advertising”. The big idea here, according to the article and on the You.com website, is to use advanced natural language processing to display more relevant search results without relying on targeted data / advertising. At least in theory, this would enable a “really private” yet fully functional search engine.

Background: The list of Davids who set out to slay the Goliath in search is long and excellent. When was the last time you heard someone say, “I’m not sure I’ll get Microsoft Edge” when they needed a quick trivia?

That being said, Socher certainly has the right background and know-how to build a better search engine and the right friends to support him. According to TechCrunch, its investors include billionaires Marc Bennioff and Jim Breyer.

Here is a conspiracy theory for you: According to the aforementioned TechCrunch article, Socher can compete with Search because of its clever AI, nuanced approach that Google can’t easily mimic and eradicate (the innovator’s dilemma), and the fact that Google is involved in antitrust lawsuits.

Gasp! What if Socher had strayed from Salesforce (but not too far, after all, Benioff is his benefactor) just to do the big job on You.com while the world’s Googles and Facebooks figure out if a Biden admin dated them Rule out antitrust law will hook.

It’s not a bad way to test the water. If the search is fragmented by Google, You.Com can compete against it. And if the Google Opoly stays intact, it would be interesting to find out how difficult it would be for Salesforce to buy out the You.com startup at some point in the future.

Take quickly: That could be good for everyone. Google has long dominated the planet on the wings of search. Making the switch could help us break away from an ad-supported society giving away their data for free about how trees remove carbon monoxide from our air without thanking them for their privacy.

Has anyone seen a research paper on You.com?

Published on December 8, 2020 – 22:25 UTC

Categories
Technology

The most effective photo voltaic chargers on your telephone or pill

Let’s face it, our phones are often about to shut down, usually due to a dead battery. This is especially frustrating on a hike, camping trip, or other outing where you might rely on your phone for GPS coordinates.

Fortunately, the sun is always on – at least during the day – so why not use the energy of the sun and keep your devices running even when you are hiking in the middle of nowhere? After months of testing, we decided on that BigBlue 28W The best solar charger for backcountry power thanks to its affordable price and efficiency. However, if BigBlue’s range is too big for your needs, we have some alternatives.

further reading

BigBlue 28W solar charger

  • Capacity – None (panel only)
  • Outputs – 2 USB (2.4A)
  • Weight – 22 ounces
  • Solar panel – 28 watts

Many solar chargers are marketed as portable solar options, but few match the BigBlue 28W solar charger. The device is not the smallest panel on the market, but it offers considerable performance. The solar panel charges quickly and reliably even under adverse conditions and then charges several devices quickly. With a manufacturer’s recommended price of $ 60, the Big Blue is also easy on the wallet. The only catch is that BigBlue doesn’t contain a battery. You will either need to charge your electronic devices directly or provide your own portable battery.

Renogy E.FLEX 10W

  • Capacity – None (panel only)
  • Outputs – 1 USB port (1.92 A)
  • Weight – 13 ounces
  • Solar panel – 10W

While the Renogy E.Flex doesn’t have battery support (meaning it’s only useful in sunshine), it’s one of the cheapest panel-only options that gets high marks for both durability and chargeability. A 1.92A USB port should provide enough power to charge your phone at about the same time as traditional power and even power your phone without draining the battery in full sunlight. These are many other panel-only options, most of which are more expensive – can’t. There’s a 5-watt model on Amazon for just $ 24, but it produces less than an amp of current on the USB ports, making it inadequate for many uses.

NekTeck 21W solar charger

  • Capacity – None (panel only)
  • Outputs – 2 USB ports (total up to 3A)
  • Weight – 1.3 lbs.
  • Solar panel – 21W

Although Nekteck has no battery storage capacity, we love solar charging with up to 21 watts of power generation, which is more than enough to quickly charge any portable device. In contrast to most pure solar chargers (those without a battery), the Nekteck model can charge up to two devices at the same time. Keep in mind that you are limited to 3 amps total so it will take much longer to charge two devices. Another nice feature is SmartIC, which intelligently detects the device type and delivers just the right amount of power to charge your phone, tablet or GPS as quickly as possible.

Voltaic Arc 20W solar charging kit

Arc 20W solar charging kitInstagram / GazLeah

  • Capacity -24,000 mAh
  • Outputs – DC output, USB output (2A)
  • Weight – 3.25 pounds including battery and solar panels
  • Solar panel – 19.8 watts

Unlike some of the chunkier hard shell structures on the market, the Arc 20 Watt Solar Charger easily attaches to a wide variety of awnings, backpacks, and tents so you can charge evenly throughout your adventure. This 20W kit also includes the Voltaic V88 Universal Laptop Battery, which has a DC output so you can charge most laptops at least once. The external battery also provides protection against short circuits and overcharging so you don’t have to worry about frying your appliances.

Panergy 18W fast charger with LED flashlights

Panergy solar charger displayed on a table

  • Capacity -26,800 mAh
  • Outputs – USB output (up to 3A), Type C (up to 3A)
  • Weight – 1.11 pounds
  • Solar panel – 1.5 watts

Nature lovers will be delighted because this superior transportable power stone is for you. The Panergy solar charger offers 18 watts of power and a sturdy armored case that will hold up well under most conditions that nature throws at you during a hike or a camping trip. Additionally, the IPX1 weather protection can withstand most types of rainfall, and the durable ABS material keeps the pack free of unwanted dust and debris. Juicing an empty battery takes approximately eight hours. Once the battery is fully charged, it can charge both a Galaxy S10 and an iPhone 11 at least six times. Panergy’s charger is built with safety in mind and has a powerful LED that allows you to flash a distress signal from over 300 feet away. The charger is intentionally orange in color to repel insects.

Dizual 5,000 mAh portable solar charger

  • Capacity – 5,000 mAh
  • Outputs – Dual USB output (up to 1A)
  • Weight – 0.5 pounds
  • Solar panel – 1.2 watts

At a surprisingly low cost of $ 15, you get way more than what you paid for with the Dizual charger. This charger is packed with useful features, a backpack-ready design and a lanyard that you can use to attach it to the back of your bag. We wholeheartedly recommend this charger.

The eco-friendly design of the pack is also made of tough ABS materials, so you don’t have to worry if it falls or rains lightly (but don’t dive into ponds). The two USB outlets have rubber caps for protection to keep dirt and debris from clogging your ports. The built-in row of LEDs shows how much power is left in the pack.

Editor’s recommendations


Categories
Technology

The very best telescopes for 2020

As anyone who has ever looked through a telescope knows, there are few sensations similar to your first-hand look at another astral body. For many this begins a lifetime devoted to the hobby. Fortunately, there are hundreds of quality telescopes in the market to choose from.

For those looking for a telescope to observe the moon and our closest heavenly neighbors, a budget model will suffice. Seasoned enthusiasts, however, are likely to want the more sophisticated, cutting-edge equipment. Here are our six favorite telescopes for every budget and performance level.

At a glance

  • The best telescope: Orion 10019 SkyQuest XT1oi Intelliscope
  • The best portable telescope: Celestron 5SE telescope
  • The best telescope for automatic tracking: Celestron NexStar 130SLT
  • The best telescope on a budget: Celestron Astromaster 130EQ
  • The best telescope for beginners: Celestron AstroMaster 70AZ
  • The best telescope for your mobile phone: Celestron StarSense Explorer 102AZ

The best telescope: Orion 10019 SkyQuest XT10i IntelliScope

The Orion 10019 SkyQuest XT10i IntelliScope is a premium Dobsonian reflector telescope. The model has one of the largest openings you will find under a wing, which allows the lens to collect more light for the brightest views of the cosmos.

The most outstanding feature is the computer-aided object location tool: simply select the astral body you want to observe and then follow the arrows on the display to quickly orient yourself to any of more than 14,000 celestial objects. Would you like a tour instead? You’re lucky. The tour setting allows you to automatically choose from 12 pre-programmed astronomical tours, each of which is available monthly.

In addition, the wooden base and the adjustment control ensure that the telescope is always in balance in all viewing positions. The SkyQuest XT10i even comes with a 2-inch Crayford focuser and two 1.25-inch Sirius Plossl telescope eyepieces – a 25-millimeter and 10-millimeter eyepiece – not to mention a 9 × 50 finder scope , an eyepiece frame and a collimation cap.

The real problem with this guy is the general bulk of the telescope. Dobsonians are more cumbersome than other tripod-mounted models SkyQuest XT10i has a handle that makes lugging around a little less annoying. The push-to-alignment tool is really just a plus for those who prefer more manual control.

The best portable telescope: Celestron NexStar 5SE


The Celestron NexStar 5SE is a dream for astronomers and available at a fair price. The handheld device features a 5 inch bezel that provides superior light gathering capabilities in a sleek, modern building, allowing you to see some of the more fantastic highlights of our solar system in breathtaking clarity. Thanks to Celetron’s patented tracking technology, the telescope does the more meticulous work on your behalf. The telescope’s automatic locator can easily locate more than 40,000 objects in a few moments. With a built-in GPS, you can simply point the telescope at three bright objects in the sky to position the device.

Unlike some of the bulkier telescopes on the market, the Celestron NexStar 5SE weighs just 17.5 pounds, which makes it perfect for family outings in the countryside. There are telescopes that are capable of collecting and focusing more light for less money, but the sleek design of the NexStar 5SE and its on-board computer is a tempting addition. Even so, the NexStar 5SE is better suited for experienced astronomers than the casual hobbyist.

The best telescope for automatic tracking: Celestron NexStar 130 SLT


The Celestron NexStar 130SLT is a solid option for those who have already taken advantage of their first telescope. The 307x magnification and 5-inch bezel allow the device to match the performance of any model in the same price range. However, Celestron’s offering also includes the company’s SkyAlign technology while others do not. This will make it easier to carefully scan and line up your cosmic hunt. Simply point the telescope at any three objects in the sky and the device will position itself independently, taking into account more than 40,000 celestial objects.

An internal battery supplies the device with power and thus enables independent functions. In addition, the device uses NexRemote, which allows you to control your telescope directly from your computer. Everything done with the built-in hand control can be done remotely as soon as you connect to your PC. You can also assemble the device quickly and without tools, which makes it more portable than other areas on our list.

The included eyepieces certainly do the trick, but to get the most bang for your buck you may want to upgrade to something stronger. As for the cons, the only thing that really works is What is against this model is the limited battery capacity, which you will notice even more when you use the “Auto-Tracking.” Still it is NexStar 130 SLT is about as cheap as it gets when it comes to auto-tracking models with a 5-inch bezel. It’s the high point for those considering performance and affordability.

The best telescope on a small budget: Celestron Astromaster 130EQ PowerSeeker


The 130EQ PowerSeeker is one of the most popular telescopes on the market because of the price. This Newtonian style reflector telescope is equipped with a 130 millimeter glass objective lens and a focal length of 1,000 millimeters, which can be adjusted using the precision controls on the AstroMaster mount. The rifle scope also comes with a 20 and 10 millimeter eyepiece, a foldable tripod and a Starpointer red dot finder scope that allows you to locate your favorite planets in no time.

Each PowerSeekers line of products is also equipped with coated optics and industry-acclaimed The Sky software that allows you to locate a range of objects using your computer. The telescope’s smooth manual slow-motion tracking makes it easy to keep objects in the viewing area. There aren’t many other drawbacks, however. You may want to upgrade from a slightly dull eyepiece to a more powerful one. Apart from that, for the range of features, price and light size that 130EQ PowerSeeker is hard to beat.

The best telescope for beginners: Celestron AstroMaster 70AZ


The AstroMaster 70AZ is hard to beat when you’re looking to spend less than $ 200 on a telescope. The 3-inch opening allows for exceptional views of the moon and nearby planets so you can play your Newtonian whistle, and the included tripod is easy to assemble. Better still, when fully assembled, the telescope and tripod weigh just under 18 pounds. The AstroMaster also comes with multiple eyepieces and three coated lenses, which avoids focusing problems.

The main disadvantage of the AstroMaster is the lack of an automatic or more sophisticated manual tracking system. This means that you often have a short window of time to view objects before they escape your viewing area. The tripod is also a bit short, so taller astronomers may want to opt for a different tripod.

Other models on our list offer a higher base performance than this refractor model. At 165x magnification, the AstroMaster 70AZ is a good option for children or other budding astronomers.

The best telescope for your mobile phone: Celestron StarSense Explorer 102AZ

Product still from the Celestron Starseeker in a back yard

For all Apple or Android smartphone users, the Celestron StarSense Explorer 102AZ offers an additional benefit that takes stargazing to the next level. This telescope has an app called Celestrol Starseeker that guides you through stargazing. You can open the app with your phone once it is connected to the telescope’s signal to start studying the sky. Please note that the app only works on newer Android phones and on Apple phones, all models from iPhone 6 and up.

The app gives you guidance on what to see and where to position the area. It even shows you which objects are best to see and where to find them in the sky the night you are looking at the stars. If you tend to dig even deeper, the app will show you additional information, such as: B. What kind of celestial body you are looking at (planet, moon, etc.), when it rises and when it sets.

The 4-inch XLT-coated lens and the brilliant aperture of the rifle scope work together to perfectly illuminate the celestial bodies. Weighing just 15 pounds, the StarSense Explorer 102AZ is easy to unpack and set up. The only downside is that the app can be a little picky at times, but recalibrations and slow response speeds are the exceptions rather than the norm.

Editor’s recommendations


Categories
Technology

COVID-19 newsletters are sooooo 2020

Hello pandemic friends,

I have good news and bad news. I also have some great news (I’ll come back to that later) and then I have the regular news (which, as usual, is mostly terrible).

The good news: 2020 is coming to an end. The bad news: it takes coronavirus in context.

We are submitting this newsletter because it has taken its course.

The pandemic is still raging around us. And yes, there are some amazing vaccines on the way. It is really busy and there is a lot more to be said about COVID-19. However, this newsletter should only be temporary.

We will publish our final issue on Tuesday December 22nd.

This newsletter means a lot to me. It gave me complete creative freedom, and because of that, it was the most challenging and rewarding thing I’ve done as a journalist.

But it’s the readers who have shaped it. Your feedback, your responses and your willingness to take part in the discourse have defined my reporting.

Together we have explored COVID-19 in the context of the Black Lives Matter movement, queer struggle and as global citizens who want the best for our communities.

We’ve talked about the technology, science, medicine, and politics of the pandemic and even got personal. It’s been a wonderful trip, but I’m glad it’s over.

Because it’s time to take all of that perspective we’ve gained, take the “context” we’ve found and use it to move forward. We know what to do to get the pandemic under control. It’s time to mask and regulate the future.

And here comes the good news:

For me and Neural, the AI ​​section I work on here at TNW, means a brand new newsletter for artificial intelligence in 2021! Details will follow shortly.

Categories
Technology

Greatest Cyber ​​Week Drone Offers 2020: DJI and Parrot Gross sales

Now is the time of year to find the best bargains on electronics of all kinds. Cyber ​​Week offers discount everything from computers to smartwatches. This is a great time to buy what you’ve always wanted to buy but never seem to enjoy. Or when you buy Christmas gifts, you can give that special someone a great gift at a great price. One category that you should definitely check out is drones, as these once exclusive technologies are now cheaper than ever. Whether you want to get aerial photography of an area or an event, or just want to have fun with friends or family while flying a drone outdoors, you can find tons of Cyber ​​Week drone deals today.

Best Deals on Cyber ​​Week Drones

How to choose a drone during Cyber ​​Week

There are tons of different types, brands, and prices of drones. How do you know which one to choose? When choosing the best drone for your needs, consider factors such as video resolution and frames per second, additional features like video stabilization and obstacle avoidance, and the weight of the drone. More high-end drones not only record better quality videos, but are also easier to control in the air thanks to intelligent environmental sensors and more precise inputs. This is especially important on days with wind and bad weather, as it is more difficult to control a drone in these conditions. So think about what you want to use your drone for and whether you are at the mercy of the weather when you fly your new drone.

Weight is also an important factor as drones weighing more than 250 grams must be registered if you want to fly them in the US. So drones like the original DJI Mavic Mini and the newer DJI Mini 2 weigh just 249 grams, both of which are great choices for those who want to start flying right away and don’t want to worry about paperwork. If you are looking for the best video quality for professional productions, a high-end model like the DJI Mavic 2 Pro or even the DJI Mavic Air 2 offers features such as environment detection, autonomous tracking of a subject, exceptionally solid build quality, responsive controls and an excellent camera . Of course, all of these features aren’t cheap, so high-end drones are expensive!

There are tons of affordable drone pilot options for beginners too. Brands like Snaptain have many inexpensive entry-level drones under $ 200, and you can find inexpensive models from well-respected brands like Potensic too. The Potensic T25 or Snaptain SP650 are two examples of affordable drones that still allow you to enjoy the fun of flying and record videos in 1080p quality. This makes them perfect for home and leisure use.

Should you buy a drone during Cyber ​​Week?

For all bargain hunters, Cyber ​​Week is the last big sales event of the year where you get the best drones at the highest discount on the market. If you don’t take advantage of these Cyber ​​Week offers, the next time you’ll see discounts as good as 2021. There is no better time to start purchasing these Cyber ​​Week drone deals than today.

Are drone deals too good to be true?

The old axiom “if something seems too good to be true, it probably is” always applies to sales like Cyber ​​Week. Retailers like to take advantage of these events to clear their shelves of stale inventory, so a hot Cyber ​​Week drone deal you noticed earlier may be out of date by today’s standards and not have the features you really want in 2020 The excitement about the sale (or pressure tactics like countdown timers and limited availability warnings) can improve your judgment. Feel free to add the item to your cart, but do take a look around and compare prices first before hitting the checkout button.

It is also a good idea to do your research by reading guides like this before shopping for Cyber ​​Week drone deals. So you already have a good idea of ​​what you want, what features to look for, and what is actually a really great bargain. This will help you set a budget to stick to while also providing you with the information you need to prevent you from making a purchase that may later disappoint you.

We strive to help our readers find the best deals on quality products and services, and we carefully and independently select what we cover. The prices, details and availability of the products and offers in this post are subject to change at any time. Make sure they are still valid before making a purchase.

Digital Trends can earn commissions on products purchased through our links, which supports the work we do for our readers.

Editor’s recommendations


Categories
Technology

eight homes with secret passages

A home can be more than you think. If you look behind a bookshelf, under a trapdoor, or down a dark staircase, more property may be lurking around you. Secret rooms and passages that were part of the home from the start, or savvy additions that were later added by inspired homeowners.

From underground wine cellars to Batcave-like garages, homeowners design living spaces with tons of hidden nooks and crannies to ensure a quick getaway – or to simply take their home to the next level. Below are some of the more innovative hidden rooms from around the world.

DA Studio architects and artist Richard Woods created the four-story Rainbow House in central London. With transforming furniture, revolving rooms, and a lively spiral staircase that spans four floors and shows the full range of colors, this home is a sight to behold. However, one of the real gems in the Rainbow House is the secret passage built right into the floor of the master suite. With this hidden door and an attached slide, people can quickly move from the bedroom to the lounge below.

Simple walls and doors are boring. Why not spice up your living room and add a rotating wall? This black metal frame and plywood wall transforms the living room into a kitchen, revealing the home’s television. The faceted panels can also be used separately and to separate two individual rooms.

Do you love wine but can’t find a new place in your home to store your collection? UK based Spiral Cellars can solve this problem for you. The company is known for its dynamic wine cellars, like this subterranean beauty installed on your first floor.

Do you need to escape for a quiet time after dinner to ponder and ponder (and digest)? This stunning Jefferson, New York home has a secret door on the ground floor of the kitchen that leads to another part of the home.

Sometimes what’s behind a bookshelf is even better than what’s on the shelves. For example, a spacious wine cellar sits behind a bookcase in this beautiful home in Tacoma, Washington. It definitely comes in handy when you’re diving into a Danielle Steele novel.

This country style home is fairytale and is located on a hill in rural Maine. A hidden passageway is behind a bookcase that is in the turquoise common room, which allows quick access to a secret bathroom. Talk about a great escape.

We thought a house like this only existed in The Dark Knight films. This home was built along the lines of the legendary superhero pad and has underground parking that is accessible from the home’s tennis court. With lit lights on the ceiling and gray tiles on the floor, any average Joe will instantly feel like Batman.

Creative Home Engineering architectural firm specialize in a range of custom hidden doors for your home. The company is showing one of its electronic models at the nine-second mark in the video above. With the push of a button, a staircase is raised, giving individuals access to a hidden lounge.

Editor’s recommendations


Categories
Technology

A easy information to Redis and caching with NodeJS

In the past few years, Redis has been widely used in a Node.js application stack. Although the most popular use case is caching, Redis has many other use cases where you can take advantage of the lightning-fast in-memory database.

In this tutorial, we are going to give you a brief introduction to Redis. We’ll also be using Redis to create a simple cache for a node application to see how this affects performance.

What is redis

Redis is an open source data structure store (BSD licensed) in storage used as a database, cache and message broker.

You can think of a No-SQL database in which data is stored as key-value pairs in system memory. Redis also supports the storage of hard disk-persistent data if required.

Redis supports saving Multiple data structures and data types, including strings, lists, hashes, sets, and sorted sets. Supported data structures offer Redis the versatility for many use cases.

Redis is best for situations where data needs to be retrieved and delivered to the client in no time.

Redis use cases

One of the most popular use cases for Redis is caching.

What is caching?

Caching is the process of storing copies of data in caches so that applications can access and retrieve data more quickly. The goal of caching is to make data access faster than a database or remote server could allow. This is especially true for expensive (temporary) operations.

As a back-end developer, it is our job to meet customer requirements as quickly as possible. Sometimes queries require multiple operations like getting data from a database, doing calculations, getting additional data from other services, and so on, which affect our performance.

This is where caching stands out because we can process the data once, store it in a cache, and later retrieve it directly from the cache without having to perform all these expensive operations. We would then update the cache periodically so that users can see updated information.

[Read: Why AI is the future of home security]

Caching & Redis

Because Redis is an in-memory database, its data access operations are faster than any other disk-mounted database. This makes Redis the perfect choice for caching. Key-value data storage is another plus as it makes storing and retrieving data a lot easier.

This tutorial shows you how to do caching with Redis and Node.js.

Redis for real-time analysis

Redis promises data processing operations of less than a millisecond. This makes Redis a perfect candidate for applications based on real-time data analysis.

For example, you can use Redis to store user identities and their transaction details when implementing a real-time fraud detection service. Redis even offers an AI-assisted faster transaction scoring system and faster statistical models to better handle this use case.

Other real-time analytics use cases include real-time inventory management systems and game leaderboards.

Redis for session management

If your application uses sessions to track authenticated users and manage user-specific data, Redis is perfect as a Canister. Using Redis could greatly improve the system’s performance while also making it easier to process user data, including login information, recent activity, and even a cart-like system.

Redis as a queue

With Redis, you can queue application tasks that are taking a long time to complete. You can implement first-in, first-out (FIDO) queues or create deferred queues to delay the implementation of tasks until a predetermined time.

Caching with Node and Redis

Now let’s start with the main focus of this tutorial: Using Redis for Caching in a NodeJS Application.

Caching with Redis is pretty easy. When we receive a user request for a route that has caching enabled, we first check whether the requested data is already in the cache. If so, we can quickly pull data from Redis and send the response.

However, if the data is not cached, what we call cache miss, then we must first get the data from the database or external API and send it to the client. We also make sure that the data we retrieve is cached so that the next time we receive the same request, we can simply send the cached data to the user faster.

After you have a clear idea of ​​what we’re going to do, let’s start implementing.

Install Redis

If you haven’t already, you’ll need to install Redis for this tutorial.

You can download the binaries and easily compile them using the commands below.

Ping the server to make sure the Redis server is running without problems redis-cli.

When you receive In response, the Redis server is running successfully.

read this official quick guide to get a better idea when something goes wrong.

Build the NodeJS application

Basic setting

Set up the initial boilerplate for the Node application as follows.

Notice how we use two additional packages named Axios and to repeat. to repeat is the standard Redis client for Node. We use Axios to get data from an external API for this tutorial.

Before going any further, make sure you install these two packages using npm.

Get data from the external API

We’ll use that GitHub Jobs API to get data on programming jobs available in different locations around the world.

You can pass a search term for the job you are looking for to the API and get a number of available jobs in JSON format. An example request to the API looks like this.

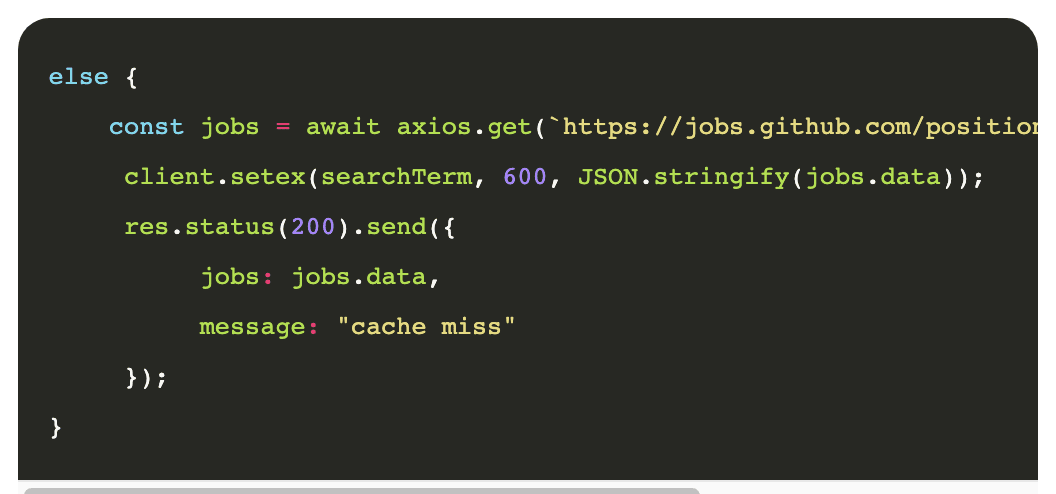
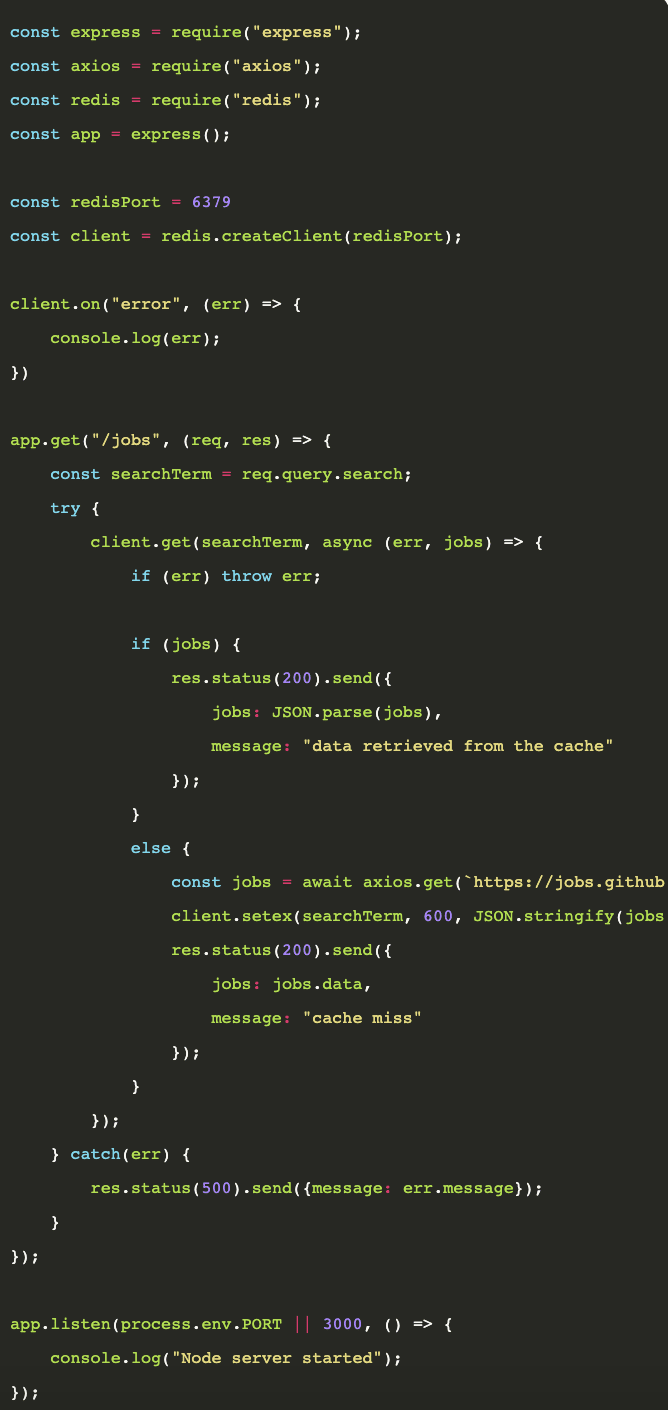
POSTMAN – GitHub Jobs API Results

In our node application we define a route with the name / jobs, which gets job data from the above API and sends it back to the client.

Here we use Axios to send a GET request to the GitHub Jobs API with the search term specified by the user.

Let’s see how the route works now with Postman.

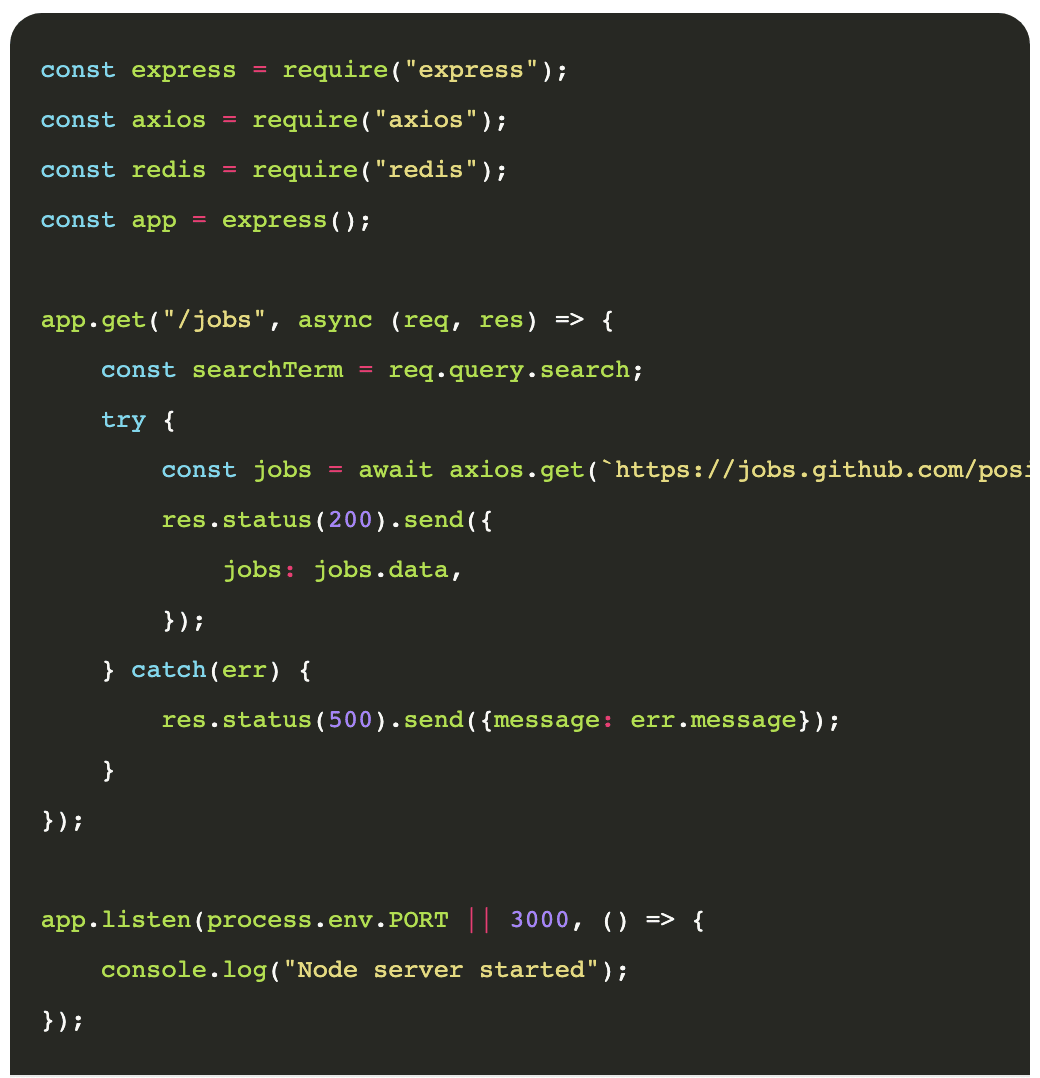
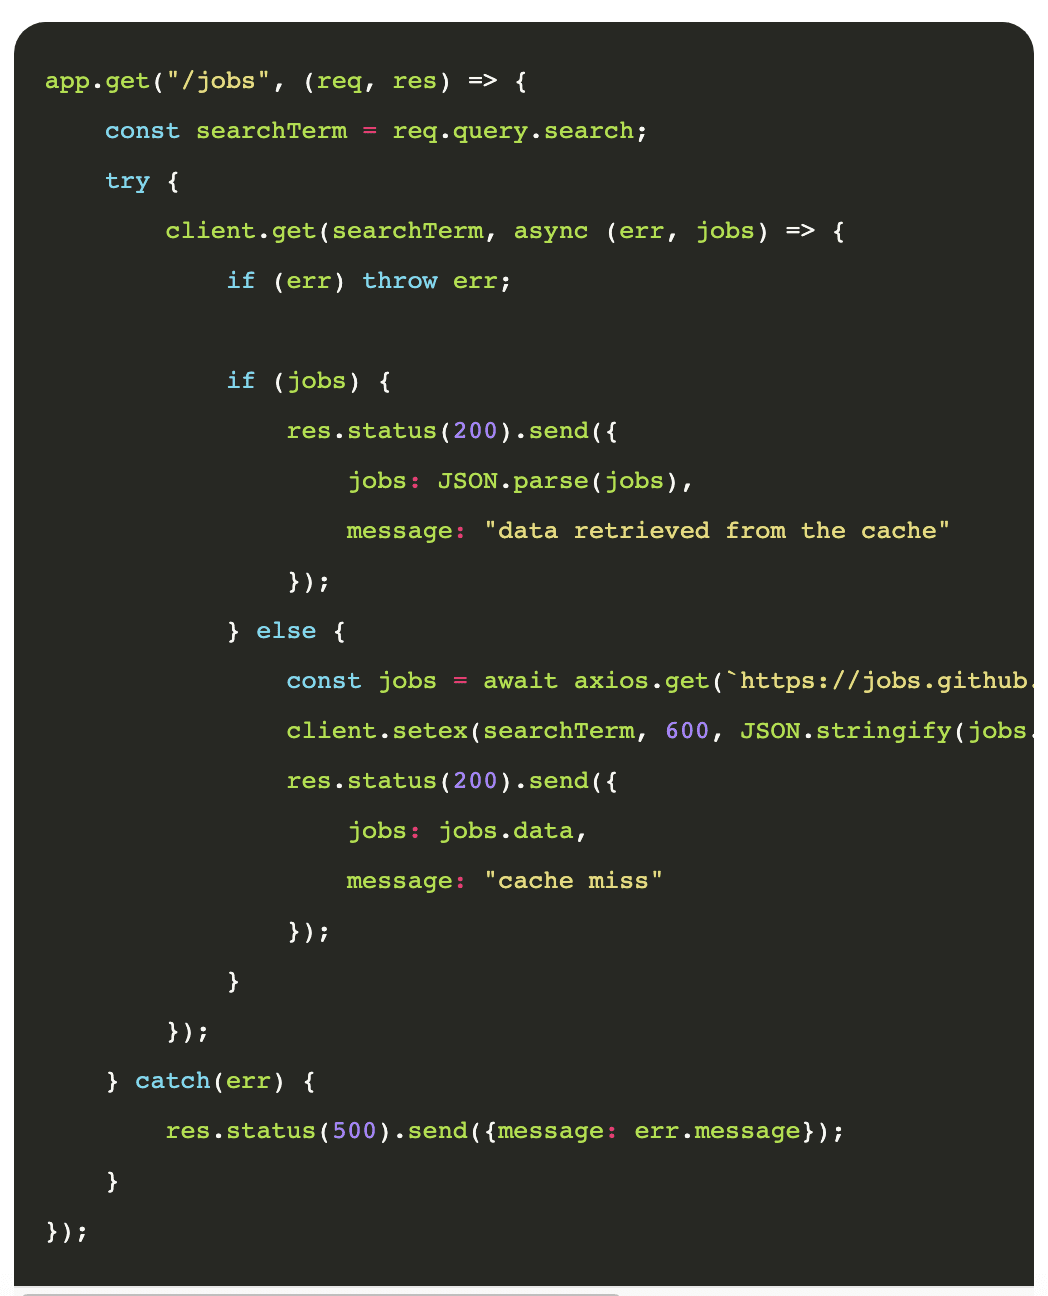
POSTMAN – Our API results
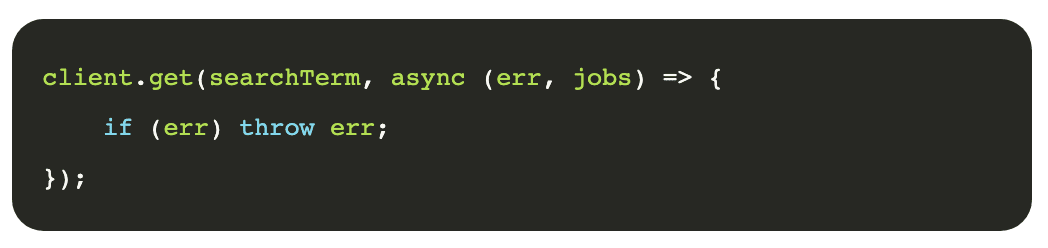
Cache the results

Now let’s see how we can use caching to improve application performance.

First, we need to connect to the Redis server through our application. For this task we will use the installed Redis package.

The Redis server listens on port 6379 by default, so we’re passing the port number to connect to Redis and create a client.

Then implement the logic to store and retrieve data from the cache.

What’s going on here?

When we receive a client request to route / jobs, the search term with the query parameters of the request is sent first.

Then we try to get the requested data from the cache, bypassing the search term that we use as the key when storing data in the cache. Since the Redis package doesn’t have native support for Promises, we need to pass a callback to process the data that is being retrieved.

If the value returned by Redis is non-zero, it means the related data is in the cache, so it’s easy to return that data in the response. Just make sure to reset the string to JSON.

If the returned value was zero, we need to send a request to the external API to get relevant data.

When we get the data from the API, we store it in Redis before sending it back so that the next time we send the same request to the node server, it can respond with cached data rather than requesting it from the API.

Notice how we use that Setex Function for storing data in the cache. Use of Setex Function specific instead of the regular to adjust Function we can set an expiration time for the stored key-value pair. Since we are setting a value for the expiration time, Redis will automatically remove this key-value pair from the cache when the elapsed time has expired.

Complete source code

That’s it. We created a simple cache for our application. It wasn’t that hard, was it?

Moment of truth: time comparison

We will see how using a cache affects the performance of our app. I used Postman to send requests to the server and measure request completion time.

performance

The first time you send a request to the server with a new search term, the application will take longer to respond (over 7 seconds) as the data must be fetched from the external API. The second time you make the same request, the server will respond more quickly because the results are already in the cache.

The request is completed within 10 ms. This is a huge increase in performance over the application we saw before without a cache.

Summary

In this tutorial, we gave you a brief introduction to Redis and used it to create a simple cache for a Node.js application. Now you can use Redis to cache frequently queried data in your application for a significant increase in performance.

You can also explore how you can leverage the best of Redis’ features in other use cases as well.

This items was originally published on Live code stream by Juan Cruz Martinez (Twitter: @bajcmartinez), Founder and publisher of Live Code Stream, entrepreneur, developer, author, speaker and maker of things.

Live code stream is also available as a free weekly newsletter. Sign up for updates on everything related to programming, AI and computer science in general.

Read on: About Time! Toyota is finally announcing a fully electric vehicle